Table of Contents Show
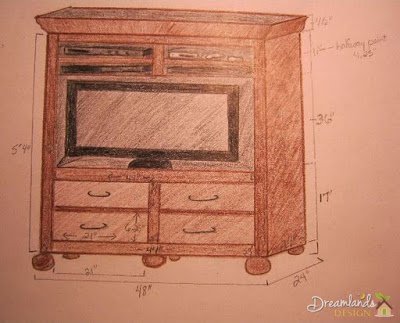
DIY TV Stand Ideas – With bigger flat screen TV’s coming out each day, people are finding they need a unit to house these larger televisions, yet storage is still needed for DVD’s and other equipment. This is one of the easiest plans for DIY TV stand ideas you will ever find. You can build a TV stand plans in only a few hours if you are used to building.
Build a DIY TV Stand Plan Ideas
There are many free DIY wood TV Stand Ideas and entertainment center plans, but none are efficient as this one. Not only will you be able to build it quickly, but there will also be little waste materials left over. These DIY TV Stand Ideas were created with frugality in mind. It is slim yet it will house all of your electronics neatly. The measurements require little cutting. Let’s get started.
What You Will Need to DIY TV Stand Ideas?
(All wood is interior untreated lumber)
Main Section of DIY TV Stand Ideas
- 3- 44″x2″x1″ pieces
- 2- 64″x2″x1″ pieces
- 1- 9″x2″x1″ piece
- 1- 13″x2″x1″ piece
- 2- 23″x64″(5’4″) 1/2″ (plywood) pieces
- 1- 23″x47″ pieces of 1/2″ plywood for the bottom – top shelf
- 1-23″x47″ piece for the top of the drawers, notched out in the front corners 1″x1″ for a custom fit
- 2-22″x46″ pieces of 1/2″ plywood for the uppermost shelf and lower shelf (between drawers)
- 1- 4’x5’4″ piece for the back of 1/2″ plywood
- 1-48″x24″ 1/2″ piece of plywood for the bottom
Drawers
- 4- 21″x6.25″ for drawer fronts
- 8- 22 3/4″ x 5″ for drawer sides
- 4- 19 3/4″ x 5″ for the backs
Trim and legs
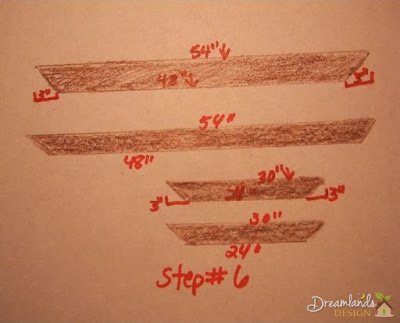
- 2- 48″x4 1/2″ molding pieces cut with mitered corners on the outward slant
- 2- 24″x 4 1/2″ molding pieces, cut with mitered corners on the outward slant to match apposing sides
- 6- pre-made oval/round legs of substantial size. Approximately 4″ from floor to top of leg. (measurements will vary according to what you can purchase)
Other items needed for DIY TV Stand Ideas
- 4-sets of heavy duty full extension drawer slides
- 4- decorative drawer pulls
- 15- “T” brackets
- 30- “L” brackets
- 90 self starting 1″ screws
- 74 1/2″ screws (self starting if you can find them)
- 6- 2″ self starting screws
- A handful of any good nail with a tiny head or without a head for the molding
- Wood putty to hide the screws for finishing
- Paint, stain or other finishing products of your choosing to finish the piece
- Medium and fine grit sandpaper
Tools needed for DIY TV Stand Ideas
- Hammer
- Drill with screw driver head or a screwdriver and a drill bit smaller than your screws
- Wood glue (optional for the joints)
- Sander (optional)
- Saw – One of these: circular saw, table saw or other
- Miter saw and box
- A small square
- Tape measure
- Pencil
Step #1 – DIY TV Stand Ideas
- Begin by finding your 1/2″ plywood bottom piece measuring 48″x24″.
- Next, find the center point of your feet and mark that spot.
- Now measure with your square from the outer edge of your foot to that center mark.
- Measure in that far from both sides of each corner. “X” will mark the spot for you to drill a small pilot hole in your bottom piece.
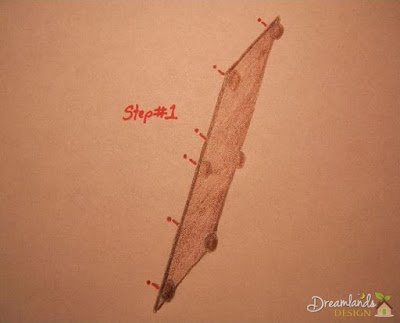
- Place each leg under the bottom piece and secure with a 2″ screw.
- Now that you have the outer 4 legs in place, you need to find the center point on the long sides. Again, measure in the same distance as you measured in before and drill a pilot hole. Secure these legs in these center points with 2″ screws.
Step #2 – DIY TV Stand Ideas
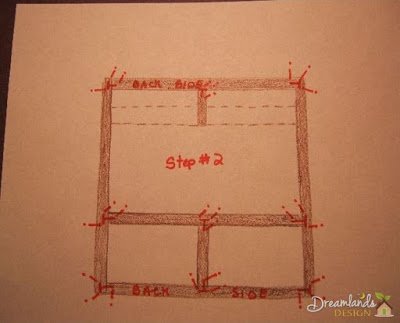
- Next, build the front frame. This is done flat on the floor.
- Butt the pieces together following the diagram, and secure the entire front together with “T” brackets. This will be the front section that dictates the positioning of shelves and drawers.
Step #3 – DIY TV Stand Ideas
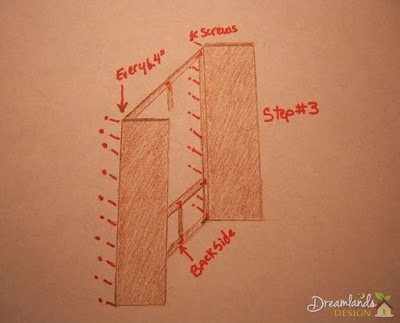
- Now you need to secure the side panels to the front.
- Follow the diagram to do this, using 1″ screws.
Step #4 – DIY TV Stand Ideas
- Next, secure the upper shelves, starting with the top one. Use your “L” brackets and 1/2″ screws on each side with one screw in the middle of your 9″ separator piece. Follow the diagram for “L” bracket placement.
- Finish the top shelves by securing the lower top shelf in place with “L” brackets and 1/2″ screws. Make the piece sturdy by placing 2- 1″ screws into the bottom of the 9″ separator piece of the front frame.
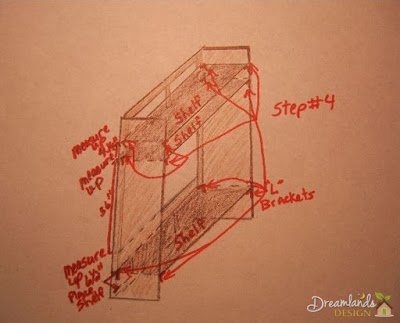
- Place the dividing shelf for the drawers in place at this time also. This placement is halfway up between the bottom drawer and the top ones. This is 6 1/2″ up from the bottom of the opening. Secure with “L” brackets just like the upper shelves.
- Finish this step of diy tv stand ideas by placing the 23″x47″ piece of wood on top of the drawer section. First, you need to cut a 1″x1″ notch out of each front corner to make it custom fit. Screw it along the top in the front every 6 ” with 1″ screws. Secure it in the back with an “L” bracket on each side. Follow the diagram for the proper placement.
Step #5 – DIY TV Stand Ideas
- Now you want to carefully lay the entire piece on its face.
- First, screw the base section that has your feet on it to the bottom of the frame and sides as indicated on the diagram.
- You will proceed to screw the back panel to the sides at 6″ intervals all the way around the piece.
- When completed, stand the piece upright again

Step #6 – DIY TV Stand Ideas
- Now it is time to cut your trim angles to an outward facing 45 degrees.
- It is important to make these match as precisely as possible.
- Not to worry if they do not match perfectly, as you can fill any gaps with putty before staining or painting the piece.
Step #7 – DIY TV Stand Ideas
Next, it is time to install the drawer slides.
- The easiest way to figure out the placement of the drawers is to install the outside portion of one of the middle drawer slide sections (the portion that secures to the piece itself).
- Once this is in place, pull it outward and set the drawer side up next to it.
- Holding it snug, experiment to see if the drawer will clear the opening and mark where the bracket sits on the drawer side with a line of pencil.
- Once this is established, all you have to do is position the drawer slide on the drawer side piece, matching up the front. It should be positioned so that when the drawer is shut, the front piece will sit flush against the front.
- Now that you have made a template, you can clamp several drawer fronts together at a time and drill out your holes.
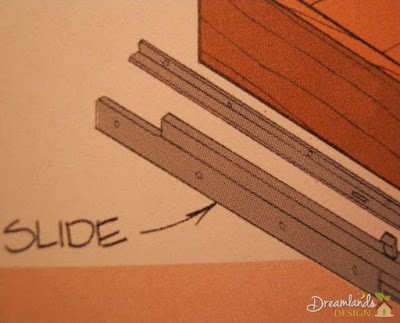
Note: Be sure you do not make your pilot holes too big if you feel you need them. You always have the option of making an indention or pencil mark where the screws are to go, then let the self starting feature of the screws do its job for you. If you are using the screws that came with the drawer slides, you will need to drill tiny pilot holes.
Continue installing your drawer slides the same way you did the first one, being careful to measure and mark the placement of all 3 you have left to install.
Step #8 – DIY TV Stand Ideas
- Now you will want to assemble the drawers.
- Begin screwing the sides to the back with 1/2″ screws.
- Next, attach the drawer bottom to the underside of the sides and back with 1/2″ screws.
- Then measure in 5/8″ from each side of the drawer front for your side placements.
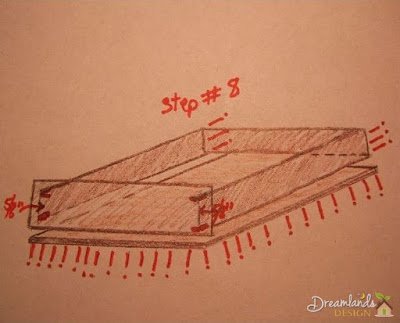
- Place the front on the outside of the entertainment center to see where it needs to be placed.
- Secure the sides to the front with your “L” brackets. Be sure to only use 1/2″ screws or less.
- Continue this process with all 4 drawers.
Step #9 – DIY TV Stand Ideas
Finally, you can add you drawer pulls centered on each drawer front.

Finishing Touches of DIY TV Stand Ideas
Now that you have finished constructing this beautiful project of DIY TV Stand Ideas, you will want to finish the piece. Be sure to sand with medium grit and then finish with fine grit to achieve a silky smooth finish. Next, paint, stain, or seal the piece to your tastes.
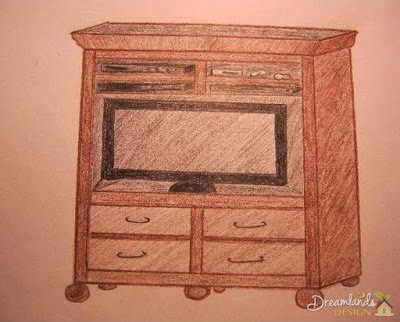
Lastly, you may wish to drill some large holes in the back panel for air and for the cables to exit through. Now is the best time to do this, as you can do a trial run to see where you need airflow and cord accessibility.
You now have a unique piece of furniture that will last for years and years. When your friends ask, just tell them you made it yourself from this free DIY wood TV Stand Ideas and entertainment center plans. They will be amazed as they watch your 42-47″ TV and admire the beauty and convenience of this piece.
How-To Magic
When you know how to make things yourself, there is a sense of pride in that. When you find just the right instructions to help you in your adventure, that is a match made in Heaven. Dream Lands Design strives to bring you just that. Concise clear, visual instructions on things you want to know how to do.
- DIY Stylish Corner Computer Desk Plans
- Moving Made Easy: How to Pack a House
- DIY TV Stand Ideas: How to Build a TV Stand Plans, Entertainment Center
- Easy Directions for How to Make a Decorative Wishing Well


