Table of Contents Show
When that drawer just won’t slide anymore, it is time to replace the drawer slides. Make this DIY project quick and easy with this how-to tutorial complete with pictures and written instructions to guide you through the process. It is time to fix-it-yourself and gets back to enjoying life.
Replacement Drawer Slides
Just contemplating the idea of how to install drawer slides is sometimes intimidating, but it is actually a fairly simple job. You can accomplish the task at hand in just a few minutes of your time.
What You Need
- A screwdriver or drill complete with a drill bit that fits the size of the screws in your project.
- New drawer slides to fit your drawer and cabinet.
- Screws
What You Do
Read Also:
Step # 1:
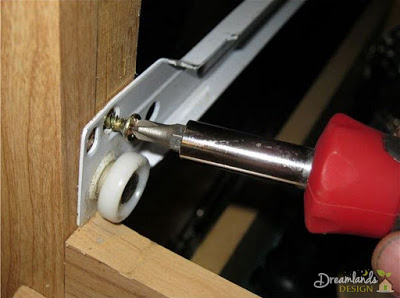
Remove the old drawer slides. There are usually screws on the inside that hold the slides to the cabinet. Start by removing the front screws.
This can be tiring when you use a traditional screwdriver so you may want to use an electric drill if there is enough room for you to get the tool in the space.
Step #2:
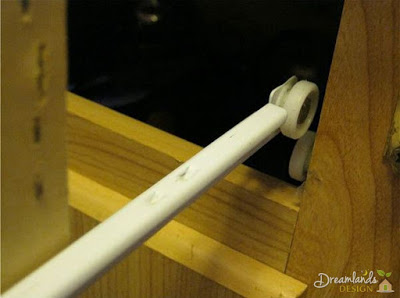
Next, remove the screws from the back bracket if there is one (not all drawer glides come with a back bracket).
Some are applied to the backboard in the same way as they are screwed into the front.
If the glide has a back bracket, this is another reason to remove the front screws first, as this makes it easier to remove the entire thing, allowing you to pull it forward when the time is right.
Step #3:
Now that you have the cabinet glides removed, remove the glides attached to the drawer by removing all of the screws one by one. When you have them all removed, the glide should come off easily.
Step #4:
Now that you have removed all of the old hardware, it is fairly simple to replace it with new pieces.
Place the new heavy duty drawer runners on the drawer section and look to see if the holes in the new hardware match the old holes. If they do not match, you will need to drill small pilot holes in order to start the screws.
Screw the new glide into place, making sure to include all of the screws. An improperly screwed glide could come loose or even fall off and send you right back to where you started from.
This should only take a few minutes if you pre-drill your holes. Be sure not to use a bit that is too large or your screws will not hold well.
- Tip: You can use self-starting screws if you have the muscle to force the screws into the wood. This method is sometimes not worth the risk if the wood is prone to splitting.
Step #5
Replace the inside cabinet glide with the new pieces. Begin in reverse order by screwing in the back screws. Be sure to include all of the screws as this is a vital pressure point in the assembly.
- Tip #1: These screws are sometimes in a difficult area to reach. You may want to use a magnetized screwdriver or driver bits for your drill. This can save you a ton of headaches as the screws tend to get lost during jobs like this.
- Tip # 2: A flashlight would be handy in a spot like this, but it is difficult to hold one. You may want to try a headlamp like the ones found in the sporting goods section of department stores. These are lifesaving devices as they free up your hands.
Troubleshooting
Now it is time to try out your new drawer. Does it slide in properly? If not, then you need to troubleshoot the problem.
- Did you position the glides correctly onto the drawer sides? If not, then you will have to reposition the glides. This may mean drilling new holes and redoing things, but it is worth the effort.
- Are the cabinet brackets flush with the starting point of the old set? This is a common mistake.
The new brackets are maybe a tiny bit shorter or longer than the old ones making the flush point different. If they are too long, you will have to return them and get a different size.
- Is there a gap at the top of the drawer where it meets the cabinet that was not there before?
This is uncommon, but it could mean the old glides were of a different thickness than the new ones. The difference would have to be huge in order to give you this kind of result.
If there is a difference in the old glides you removed and the new ones you installed, you may have to revert back to the old style or take the old ones with you and purchase a different set.
Rarely is the difference in glides so severe that you would have to go to such great lengths to have a perfect drawer.
Success
You can go from a misfit and broken drawer to a perfect drawer in no time flat. As these directions and tips help you in your efforts to fix your own drawers by replacing the drawer glides, feel free to bookmark this page for future reference.
Be sure to Subscribe! This Home Improvement Tips & Guide as she endeavors to make your life easier with the how-to articles.


