Table of Contents Show
Learn how simple it is to build deck stairs and handrails. Includes measuring the stairs and calculating the step height. Mark the stringers for cutting. Cut the stringers and install them.
Install the rail posts on the stringers. Add the step treads and mark the rails for cutting. Cut the rails and install them. Add the balusters, mark, and cut the handrails. Attach the handrails and add a mitered return to finish the job.

Step-by-step Directions for Deck Stairs Handrails (DIY Deck Stairs Handrails)
Deck stairs, railings and handrails involve some angles that might seem a little daunting the first time you tackle them. Follow these easy instructions and you won’t be afraid to tackle the job yourself.
Follow these instructions for DIY deck stairs handrails and railings.
Deck Stairs Handrails Introduction
You need deck stairs, deck stripper for patio, and handrails for your new deck. The stairs may seem daunting enough, but then there are handrails too. The angles involved may seem like a serious challenge, but in reality, they are quite simple to measure and cut.
Your stairs need to be accurate—building inspectors take stairs quite seriously and you are not allowed to vary more than 1/4 inch in the height or depth of each step.
Handrails have to be a specific height, match the angle of the stairs and many local codes require a mitered return. Follow these instructions for DIY deck stairs and handrails.
Stair Measurements
Measure the Total Rise from the top of the deck boards to the top of the landing. A comfortable step height for most people is between 6 1/2 and 7 1/2 inches.
Divide the Total Rise by 7 1/2 inches and round the result up to find how many steps you need. Then divide the Total Rise by the number of steps to find the rise of each step.

If the Total Rise is 48 inches, then 48 ÷ 7.5 = 6.4. Rounded up = seven steps. Now divide 48 by 7 steps to get 6.86 inches per step. We’ll make that 6 7/8 inches and adjust the bottom step 1/8 inch to make it up.
The tread length will be 11 inches but allow for a 1-inch overhang on each step to give a 10 inch cut for the treads on the stringers. Since we have 7 steps, 7 x 10 inches = a total length of 70 inches.
Read Also:
Stair Stringers
Lay a 2-by-12 board on a pair of sawhorses and set a framing square on it. We’ll call the short leg the rise and the long leg the run. For our example stairs, the rise is 6 7/8 inches and the run is 10 inches.
Align the 6 7/8 inch mark and the 10-inch mark on the square with the edge of the 2-by-12 and draw a line on both legs of the square.
Repeat this to mark all the steps, but shorten the bottom riser height by tread thickness and any adjustment necessary. At the top, extend the top riser cut line all the way across the board and do the same at the bottom with the tread line that represents the landing.

Cut the first stringer with a circular saw. First, cut the two extended cut lines at the top and bottom.
Then cut each riser and tread, stopping when the blade reaches the junction of the two lines. Finish each cut with a hand saw or jigsaw.
Use the first stringer as a template to mark the other stringers. Three stringers are the minimum for the 32-inch wide stair. Each additional width of up to 16 inches requires an additional stringer.
Measure down from the top of the deck the distance of 1 riser plus the tread thickness and mark the top tread.
Attach the stringers using stringer hangers at this point. Stringer hangers work just like joist hangers except the bottom support is angled to accept the stringer
Railing Posts
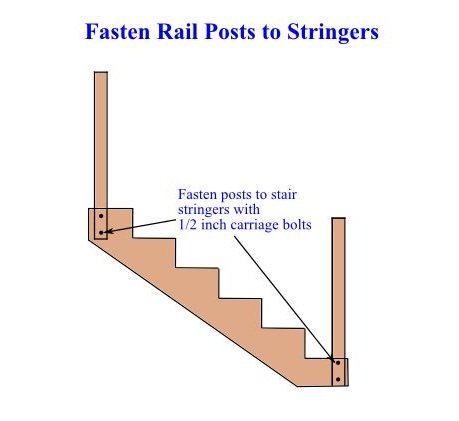
It’s important that the railing posts are secured properly to prevent accidents and injuries that may occur later on. With time, nails or even wood screws may come loose, separating the railing post from the stringers and creating a falling hazard.
Attach railing posts with 1/2-inch carriage bolts. Clamp the posts to the stringers and plumb them from side to side and front to back with a post level or 4-foot level.
Drill two holes through the post and stringer for the bolt and insert the bolt from the outside.

Place a washer over the bolt and add a nut. Tighten the nut until the head of the bolt just begins to dimple the wood, but doesn’t cut the wood fibers.
Install the stair treads after all the posts are installed. Stair treads will increase the deck stair safety and even outdoor aesthetics. Be sure to leave a 1/8-inch gap between the tread boards.
Stair Railings
Lay a 2-by-4 flat on the stair extending from the top post to the bottom post. The board must rest at the end of each stair tread. Use the post as a guide to mark a line at the top and bottom of the stairs. This marks the angle to cut on the railing.
On your miter saw, set the table angle to match the angle marked on the 2-by-4. Record this angle on paper for use while cutting balusters and the handrail.

Cut the 2-by-4 on the miter saw at the cut marks. This will be the top board of the railing. Set another 2-by-4 on edge and mark it the same way, except the marks will be across the face of the 2-by-4 instead of the edge.
Mark another 2-by-4 the same way and cut both 2-by-4s on the miter saw.
Railings and Balusters
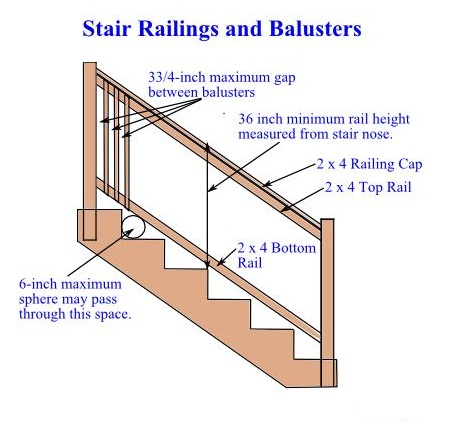
Lay the first 2-by-4 flat on the stairs between the two posts to use as a spacer. Set the second 2-by-4 on edge on top of the first.
Make the 2-by-4 flush with the face of the posts on the stair side of the posts. Fasten the 2-by-4 to the railing posts with railing brackets and remove the first 2-by-4 from under the second.

Measure up the posts to the railing height minus 1 1/2 inches and mark the posts. Fasten the third 2-by-4 to the posts with railing brackets.
Now lay the first 2-by-4 on the flat top of the third and fasten it to the posts and the third 2-by-4 with screws.
Cut the baluster ends with the angle recorded earlier. Install with finish nails or screws.
Handrails
The handrails are not as hard as they might seem and will finish up the DIY deck stairs handrails project. You will make a mitered return on the end of the handrail and fasten the handrail to the stair railing posts.
Measure the top and bottom posts for the hand railing height and mark them. Measure from the mark on the top post on the side closest to the deck and on the opposite side of the bottom post.
On the miter saw, cut a 45-degree angle on the end of the handrail stock so that the side of the handrail closest to the railing posts in the short side.
Measure along the long side of the handrail stock to mark the other cut to the length of the handrail and cut the handrail to length at a 45-degree angle. This makes the handrail shorter on the post-side face and longer on the stair-side face.
Read Also:
Install the cut handrail on the posts using brass handrail brackets. Screw the handrail standoffs to the posts. Set the handrail on top of the standoffs and have a helper hold it in place. Drill pilot holes for the clamps and screw the clamps over the standoffs.
Measure between the point of the angle cut on the handrail and the railing post for the mitered return. Measure the handrail stock for the cut. Set the miter saw table to 45 degrees and cut off the handrail ends.
Apply glue to each face of the 45-degree cut on the handrail and the mitered return. Hold the piece in place and drill two pilot holes for finish nails. Nail the two pieces together with galvanized finish nails.
References
- How to Build Deck Stairs: https://www.familyhandyman.com/decks/how-to-build-deck-stairs/view-all/
- Photo by Penny Blankenship at Flickr.com
Deck Building 101: You Can Do It Yourself
DIY Deck Stairs Handrails! You can build a deck yourself. We’ve got tips, construction drawings, plans, cost estimating and more in this series on building decks. You’ll find the information you need to turn your dream of outdoor living space into reality.
- Tips for Deck Building
- DIY Deck Stairs Handrails: Step-by-step Directions for Deck Stairs Handrails
- Cost of Building a Deck: Make an Easy and Inexpensive Deck Plans
- How to Make Stair Stringers, Stringer Attachment Methods
- How to Determine Deck Framing Lumber Sizes


