Table of Contents Show
Simple platform bed plans are easy to create. A bed frame is nothing more than a rectangle that must accommodate the size of the mattress.
Careful measurement of materials and adjusting for allowances will be the most difficult aspect of this project. So, How to build a wooden bed frame step by step? let’s discuss…
Gather Materials
Measure the size of the mattress that will sit atop of the DIY bed frames. You will need the height, width, and thickness of the mattress.
The following instructions are for a Queen size foam mattress that is 10″ thick. Adjust measurements for other sizes.
The listed supplies are easily available at home improvement stores. Wood pieces can be cut to size at the store and put together at home.
Read Also:
Wood Pieces:
- 1 – 4′ x 4′ post – 56″ long (Cut at the store into 14″ long pieces to be used for bed legs)
- 2 – 1′ x 6′ planks – 75″ long (Cut at the store to size)
- 2 – 1′ x 6′ planks – 58″ long (Cut at the store to size)
- 4 – 2′ x 4′ studs – 60″ long (Cut at the store size)
- 2 – sheets of plywood 4′ x 8′ – 3/4″ thick (Rip cut 30″ and crosscut 77″)
- 2 – Wood rails to attach to foot & headboard pieces – 1″ x 2″ – 48″ long (Cut at the store size)
Metal Pieces
- 8 – 2×4 hanger brackets
- 12 – 1″ wood screws
- A box of 1 1/2″ wood screws
- 8 – 2″ L brackets
The Tools Needed for DIY Bed Frame
- Cordless screwdriver
- Pencil
- Tape measure
- Hand saw (to cut notches on support planks)
Additional Items for DIY Bed Frame (Optional)
- Paint in the desired color
- Varnish in desired stain or clear
- Paintbrushes or rollers
Note: Make the DIY Bed Frame easier by painting or varnishing all wood pieces prior to assembly and allow to dry completely.
Building Head and Foot
There are many ways to create simple platform bed plans. The one described here is both sturdy and minimalistic.
Headboard and Footboard Assembly for DIY Bed Frame
Measure 12″ from the bottom and attach the bracket to the leg pieces using 1 1/2″ screws.
Attach 1x6x58 to the other side of the bracket using 1/2″ screws. – This measurement will give you enough room to hold the mattress in place when we are done building the frame – Repeat process above for the remaining end.

Notice the “L” bracket on the inside portion (section labeled as 1). You should now have 2 identical pieces that make up the top and foot of your bed.

The next step is to join the two sections together by utilizing the 1x 6 planks cut into 76″ lengths. This will make the bed’s side rails.
Side Rails: DIY Bed Frame Ideas
Join the side rails, these are the 75″ long pieces that will create a rectangular frame. Attach rails to metal brackets as shown in the picture using the 1/2″ screws.

Attach rails to the “L” brackets, in the same manner, you attached the pieces that made up the headboard and footboard.
Platform Support Rails
Hanger Brackets
As you can see, the planks support the plywood pieces that will complete the platform construction and support the weight evenly.
This simple How to build a wooden bed frame step by step plan is designed to take up as much space as a mattress.

Plywood Notches: DIY Bed Frame Ideas
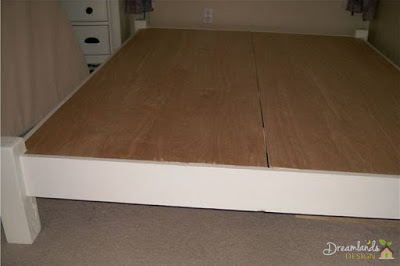
- Use the hand saw to cut a measured notch for leg post. Repeat on all 4 corners and lay both sections of
- Plywood flat on top. The picture below shows the finished product.
- The picture below shows the corner detail. All four corners should look the same.
- Notice how the height of the legs braces the mattress. This is helpful when using an air mattress.
- When Build a Wooden Bed Frame plans, consider purchasing already made furniture legs to add your unique style.



References
- The information provided in this DIY Bed Frame Ideas and How to Build a Wooden Bed Frame Step by Step for these simple platform bed plans is a homemade project designed from scratch.
- Popular Mechanics; How to Turn Easy-to-Make DIY Boxes Into Flexible Furniture: http://www.popularmechanics.com/home/how-to-plans/how-to/a5394/4341021/?click=main_sr
- My Family Loves It; How to build a platform bed: http://www.myfamilylovesit.com/blog/?p=1198


