
Table of Contents Show
If thatch buildup is ruining your lawn, then here’s a DIY guide that will assist you in making your lawn dethatcher. There are two ways to get rid of the thatch and this article discusses them both.
How to Make a Homemade Lawn Dethatcher
Lawn thatch is the build-up of organic debris such as pine needles, dead leaves, and grass clippings below the grass.
In most cases, this debris will decompose naturally and won’t cause any problems. However, when it doesn’t decompose on its own, it can make your lawn look bumpy and dishevelled. This yard work is just as important as knowing how to kill weeds in flower beds, lawns, and courtyards.
Common Causes of Thatch Buildup
Several factors can slow down the natural decomposition of thatch:
- Cold Climate: Low temperatures can hinder microbial activity responsible for breaking down organic matter.
- Frequent Mowing: Cutting the grass too often can contribute more clippings than microbes can handle.
- Excessive Use of Fertilizers and Pesticides: These chemicals can disrupt the balance of organisms that decompose organic matter.
When left unattended, this thatch can cause the grass to remain deprived of the nutrients and moisture it needs for proper growth. Additionally, grassroots may begin growing upwards instead of going down into the soil.
There are two ways to handle this problem:
- Removing the thatch layer physically
- Promoting the organic decomposition of the thatch
Doing them both is certainly a better choice. So, here’s how to make a homemade lawn dethatcher – one for physical dethatching and another one to promote organic dethatching.
Make Your Homemade Dethatching Rake
Before you begin dethatching your lawn, you must check how thick the thatch layer is. You don’t need any measurement device—just push your finger into the layer and you’ll know how thick it is.
Using a lawn rake is advisable only if the thatch buildup is more than half an inch thick. If this is not the case, move on to the next section describing how to make a lawn dethatcher spray.
Materials Needed
To create your dethatching rake, gather these simple materials:
- Two wooden planks at least 1 inch thick, 2 inches wide, and more than 2 feet long.
- 10 nails at least 4 inches long
- 5-6 nails or screws – 2 inches long
- One four to five-foot-long pipe or wooden pole for the handle
Instructions
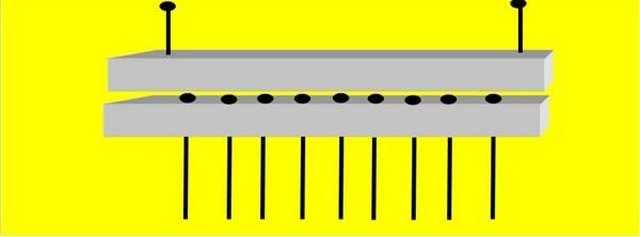
Step 1:
As shown in the image below, take one of the wooden planks and hammer the 4-inch long nails into it. Place them roughly at a distance of one and a half to two inches from each other.
Tip: If you’re using a thicker piece of wood, buy longer nails so that the spikes remain at least 3 inches long.

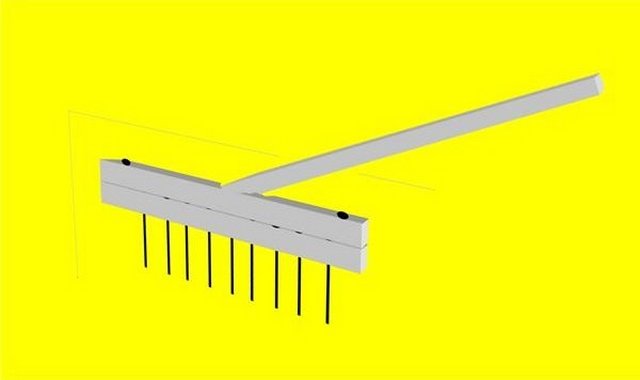
Step 2:
Next, place the second wooden plank on top of the first one as shown in the image below, and join them both using the 2-inch long screws or nails.
Now your homemade lawn dethatching rake is almost ready—all that’s left is to fix the handle. Here’s what your finished rake should look like:
Using the Rake for Dethatching Your Lawn
Whether you’re using your homemade rake or a commercial lawn rake, there are some small things to keep in mind:
- Physical dethatching shouldn’t be done too often—you’ll do more damage than help. Over-dethatching can stress your grass, leading to bare patches and increased susceptibility to pests and diseases.
- When using the rake, keep its spikes tilted at a 45-degree angle to the ground. This ensures that you effectively remove the thatch layer without uprooting healthy grass.
- Don’t dig into the soil; glide gently through as if combing. The goal is to lift and remove the thatch, not disturb the soil structure.
- The best time for dethatching is when the soil is mildly moist—not completely wet or dry. Water your lawn lightly a day before you plan to dethatch if conditions are too dry.
- The ideal seasons are spring and late autumn. These periods allow your lawn to recover quickly due to favourable growing conditions.
- Move in straight lines; avoid raking any patch more than twice. Excessive raking can damage grassroots and create uneven patches.
After Dethatching
- Water your lawn well to help it recover from stress. A deep watering session helps restore moisture balance and encourages new growth.
- Use collected thatch for organic compost—this nourishes grass later on. Thatch is rich in nutrients; composting it returns these nutrients to your garden.
By following these steps diligently, you ensure healthier grass with roots growing deep into nutrient-rich soil! Consistent care after dethatching will promote robust growth and a lush green lawn.
Instructions for Making a Lawn Dethatcher Liquid to Promote Organic Decomposing
While the rake method is effective for dethatching your lawn, using a homemade liquid dethatcher can significantly accelerate the decomposition of the remaining thatch layer. Here’s how you can create an efficient dethatching liquid.
Ingredients:
- Sugar – ½ pound
- Ammonia – ½ cup
- Beer – ½ can
- Dishwashing Liquid – ½ cup
- Water – 2 liters
Before mixing the ingredients, verify that your dishwashing liquid does not contain any antibacterial agents. These can harm beneficial microorganisms essential for decomposing thatch.
The quantities mentioned are suitable for approximately 100 square feet of lawn. Adjust these quantities based on the size of your lawn. Once your liquid dethatcher is prepared, you can spray it evenly using a hose sprayer.
Preparation Steps:
- Check Ingredients: Ensure all components are free from harmful chemicals or antibacterial agents.
- Mix Thoroughly: Combine sugar, ammonia, beer, and dishwashing liquid in a large container.
- Add Water: Gradually add 2 litres of water while stirring continuously to ensure an even mixture.
- Transfer to Sprayer: Pour the mixed solution into a hose-end sprayer for easy application.
Application Tips:
- Pre-Watering: Water your lawn thoroughly for 3-4 hours before applying the dethatching liquid to enhance absorption.
- Event Coverage: Use the sprayer to apply the liquid uniformly across your lawn surface.
- Post-Application Care: Avoid watering for at least 48 hours after application to allow microorganisms to start breaking down the thatch.
The dethatching liquid will attract beneficial microorganisms that assist in decomposing the thatch layer. The best part about this organic solution is that all ingredients are completely safe and will not damage your grass or soil.
By following these steps, you can ensure a healthier, more vibrant lawn with minimal effort.
References & Credits
The information provided in this article is based on the author’s knowledge and experience, supplemented by reliable sources:
Special thanks to the UC IPM Thatch Management and The Housing Forum for their valuable resources in the creation of this guide. If you have any further questions or need additional assistance, please don’t hesitate to reach out. Happy dethatching!
FAQs (Frequently Asked Questions)
Thatch buildup is the accumulation of organic debris such as pine needles, dead grass, and leaves on the soil surface. It can ruin the lawn by preventing water, air, and nutrients from reaching the soil and roots, leading to a decline in lawn health.
Several factors can slow down the natural decomposition of thatch, including over-fertilization, excessive watering, compacted soil, and using pesticides excessively.
To create your own dethatching rake, gather these simple materials: two wooden planks, nails or screws, and metal tines or nails for raking.
To make a lawn dethatcher liquid, you will need sugar, ammonia, beer, and dishwashing liquid. Mix these ingredients in specific quantities and apply the solution to your lawn following the provided application tips.
Whether you’re using your homemade rake or a commercial one, gently rake through the grass to remove the thatch buildup. Be careful not to damage the healthy grass while doing so.
After dethatching, water your lawn well to help it recover from stress. A deep watering will promote healthy regrowth and aid in the recovery process.


2 comments
If you are a beginner or have done some woodworking you will find these plans: http://www.bestquicktips.com/woodworking-projects easy-to-follow as the instructions are very clearly written. Even if you are a total newcomer to woodworking you will be able to master all the techniques that are needed and the woodworking skills very quickly.
What a great DIY guide on tackling thatch buildup in lawns! The homemade lawn dethatcher seems like a cost-effective solution for maintaining a lush green garden. It is also worth considering, before dethatching, mow your lawn slightly shorter than usual. This makes it easier for the dethatcher to reach and remove the thatch effectively. A shorter grass height ensures a more thorough job and promotes better overall lawn health.
Thanks,
Al Gardener