Table of Contents Show
Plantation shutters were once popular along the southeastern coast in the United States to let the cool breeze in and keep the hot sun out.
Later, the shutters became popular throughout the country and are considered a premium window treatments option. The average DIY Woodworker can build these custom plantation shutters window treatments on their own.

DIY Plantation Shutters Window Treatments
DIY plantation shutters cover the inside of windows in place of blinds or curtains and work much the same way that blinds do. Traditionally, this type of shutters window is made of lightweight wood with wide louvers. The shutter attaches to the window with hinges. The louvers open and close by moving a center-mounted rod or handle up and down.
This woodworking project on how to make your own DIY plantation shutters window treatments has a moderate skill level and requires a few shop tools. You’ll need a table saw or band saw, a planer, a router table, and a drill press.
Shutter or louver pins hold the louvers to the frame and allow them to rotate. You can buy shutter pins online at a number of retailers. You should know and understand how to make a repeatable setup for your drill press.
Buy DIY shutters online in Australia from the local experts.
Read Also:
Design Considerations of Custom Plantation Shutters
Determine the width first. Since most shutters swing on hinges, you’ll want to minimize the arc they cut when you open and close them. Fifteen to twenty inches (15″ to 20″) is probably the maximum width you’ll want to make the frames, and a bit smaller is often a good idea on all but the largest of openings.
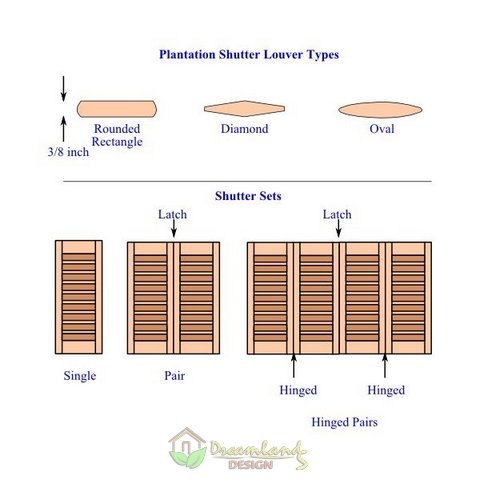
- A narrow window might have just one shutter. A wider window will have two, one on each side. An even wider window will have four and use pairs of shutters connected by hinges on each side. When you layout your frames, take the window width into consideration and make your plans for one, two, or four shutters.
- Determine the shutter height. On tall windows, you might want to consider making tall shutters with a top and bottom half, each with its own set of louvers and handles. Another design possibility is to use a raised panel on the bottom and louvers on the top.
- The height of the stiles is the same as the height of the shutter. The width of the rails is the shutter width minus two times the stile width. Don’t forget to allow for tenons on the ends of the rails. The rail height is generally about two to three times the width of one stile. Start out at three times the stile width, then adjust it to make the louvers fit.
- The louvers start out at about 3/8 inches thick and the lengths are cut to fit between the shutter frames. They measure anywhere from 2 inches to 4 1/2 inches wide. Special purpose pins called shutter pins, or louver pins, hold the louvers to the frames.
- One design consideration is the hole spacing for the louver pins in the frame styles. Position the two top pins one-half the width of the louvers, minus 1/4 inch, down from the bottom of the top rail in the stiles. Each subsequent hole is one-half the width of the louver minus 1/4 inch down from the previous hole.
- After the louvers are installed, you won’t see a gap at the top and bottom when the louvers are closed. This allows the louvers to move freely and close against the top and bottom rails.
Over the years, three basic louver designs have emerged. The easiest to make is flat with rounded edges. Other designs use oval or diamond shapes. See the drawing for details.
Some DIY plantation shutters install without hinges and permanently cover the windows. Take this into consideration when you design your custom plantation shutters window.
Purchasing DIY plantation shutters online at my direct blinds.
Custom Plantation Shutters Construction
- Cut your stiles and rails as determined in the design phase. On the lower rail, cut a 3/8-by-3/8 inch rabbet in the back along the top edge for the louver to close against. In the top rail, cut a 3/8-by-3/8 inch rabbet on the front along the bottom edge.
- Then cut a 3/8-by-3/8 inch notch in the front of the top rail above the rabbet for the tilt rod to fit into when the louvers are closed. Assemble the frame without gluing it and make any adjustments to get the fit perfect.
- Measure the inside width of the frame for the louver width and subtract twice the thickness of the washer on the louver pins to obtain the louver length.
- This is a critical measurement to make on each shutter. The louvers and pins must just fit inside the frame without any extra space.
- After assembly, the friction between the shutter pin washers and the stiles holds the louvers in position—open, closed, or anywhere in-between.
- It is better to cut the shutters slightly oversize and trim them if necessary for a just tight enough fit.
- Cut your louvers on the table or band saw and plane them to 3/8 inches thick. Install a 3/8 round-over bit on your router and round the edges, but not the ends. Cut them to the length previously determined.
Note: This procedure describes the simple rectangular profile with rounded edges. Cut the same profile for ovals, then use a hand plane to round off each louver individually to create the oval shape.
The diamond profile is cut on the table saw with blade at a slight angle. Cut the bottom half of one side, then the top half of the other side. Tape the cut off taper to the saw fence and cut the two halves on the other side of the louver.
- A bit of sanding with 220 grit sandpaper will prepare the louvers for paint or stain.
- Set up your drill press with a repeatable set up to drill a hole in the ends of each louver to receive the shutter pins. Drill the hole for the shutter pin centered at the end of each shutter.
- Layout the hole positions for the shutter pins on the stiles. Using another repeatable setup, drill the holes for the shutter pins in each stile.
Tips: The narrower diameter end of the shutter pins fits into the louver, the wider diameter goes into the frame. Measure the pins for the correct drill sizes to use. Also note that you can buy spring loaded shutter pins which allow you to remove the louvers for cleaning.
- Place one stile in a vise or clamp to hold it in place. Fit the tenons on the two rails into the mortises. Insert a pin into each louver end, and insert the other end into the holes in the stiles. Fit the remaining stile into place, aligning the tenons and mortises first, then the louver pins.
- Recheck the entire assembly and make any required adjustments. Disassemble the shutter.
- Put glue inside the mortises on the clamped stile and on the ends of the rail tenons. Insert the rail tenons into the mortises, and the louver pins into the pinholes. Add glue to the rail tenons and to the mortises on the remaining stile. Fit the stile onto the rails and louver pins.
- Clamp the assembly, check for square and adjust if necessary. Keep the assembly clamped for one hour if you are using yellow wood glue, or the set time for other types of glue.
- While the glue dries, manufacture a tilt rod 3/8-inch wide and 3/8 inch thick, and about 1/2 inch longer than the distance between the bottom of the top louver and the bottom of the bottom louver. Round one side of the tilt rod for the front face with a 3/8 inch round-over bit in the router for an extra bit of style.
Must Read:
Tilt Rod Connections

- Pairs of crown staples connect the tilt rod to the louvers. Set up a crown stapler to shoot a staple that will not go all the way into the wood, but rather stands 1/4 inch above it. Most staplers won’t do this on their own; you’ll have to hold the stapler off the edge of the louver with a block.
- Lay the shutter down with the face that will show up. Turn all the louvers vertical—what would be horizontal if the shutters window were standing upright. Mark the center-line down the louvers and lay the tilt rod on top of it. Mark each shutter edge on the tilt rod.
- Remove the tilt rod and shoot a crown staple into the tilt rod at each mark and leave the crown on the staple exposed, 1/4 inch proud of the surface. The staples are positioned vertically on the back edge of the tilt rod.
- Lay the tilt rod back on the louvers with the staples down, and turn it just enough to expose the staples. Shoot a staple into the edge of each louver so that it connects the staple on the tilt rod to the louver. The staples interlock, like two links in a chain to provide a flexible connection between the tilt rod and the louvers.
- Now you can tilt the louvers up and down by moving the tilt rod up and down.
Hinges
Hang the shutters window with standard brass butt hinges. You’ll want to route mortises in the stiles for the hinge plates, and probably on the window as well. If you’re hanging them in pairs, two on each side, then you’ll want at least four extra hinges.
Be sure to put them in the same place on each shutter so they all lineup. When you hang DIY plantation shutters in pairs that way, place a small pull on one of the connecting stiles for each pair. That way, when you pull the shutter out, the pair of shutters fold gracefully in half and you can fold them to the side.
Now you know how to make your own DIY plantation shutters with this easy guide: DIY Plantation Shutters, Custom Plantation Shutters Window Treatments.
References
- Photo of custom plantation shutters window treatments By BrianWright at the English language Wikipedia, CC BY-SA 3.0, Link





1 comment
Ms. Iris, you have done a fabulous job describing in simple to understand language how to construct plantation shutters and in doing so, you’re doing a great job promoting the DIY concept.
My name is Errol Barrois, and I have a website called customshutters. guru. We offer traditional custom plantation shutter fabrication and installation to homeowner in the Houston, TX area, as well as our Do-It-Yourself Store for the DIY folks. I come from a family of carpenters and love working with wood. I discovered plantation shutters several years ago and just love their appearance.
The products we offer in our DIY Store are basswood, pre-primed with a smooth finish requiring little preparation for final painting. I would appreciate hearing from you and checking out my website: http://www.customshutters.guru
Thanks,
Errol Barrois
CustomShutters.Guru