Table of Contents Show
Making a DIY WiFi booster is so easy with these top methods. Boosting your WiFi signal doesn’t require expensive gadgets – use foil, a bowl, or even a tin can, to make your own wifi signal booster.
Easy to follow step-by-step plan, and pictures are included, including making your own cantenna, and a parabolic reflector from foil.

DIY WiFi Booster: Easy Methods to Create a WiFi Signal Booster Yourself
A DIY WiFi booster can be as simple as a piece of aluminum foil and a bowl, through to making your own cantenna from a can. Even a novice can boost a wireless signal using these four methods to make your own WiFi signal booster.
However, if you want better results buying a wifi extender will be better. Although these highlight the best ones for gaming, we think they’re just the best ones overall if you’re looking for fast internet across a larger area.
Using the internet via a wireless router in our homes has never been more popular, but sometimes the router just doesn’t provide a strong enough signal. Using a DIY WiFi booster is an excellent way to improve your signal for little to no investment, other than a few minutes of your time.
Several things can impact the WiFi signal, from the thickness of walls to the usage of microwaves near the router. Creating your own WiFi signal booster to get around this problem can be achieved in many ways.
If you are using your Wi-Fi on Apple devices like iPhone, iPod, and MAC then you need to check the Best Quality Router for Apple devices by Bestofrouter
Use Aluminum Foil
The easiest of all the signal boosting methods shown here, with highly effective results, uses aluminum foil to create a DIY Parabolic reflector.
Aluminum foil
- Take a large rectangular piece of aluminum foil and fold it in half.
- Fold each side in by about 1/2 inch/1 cm, creating a frame, to make the reflector more stable.
- Curve round your foil to make an arc shape and position behind your WiFi router, and watch your WiFi signal boost instantly.
Use a Metal Sieve
This method uses the same principle as a parabolic reflector above but utilizes a USB WiFi dongle to boost the signal, instead of acting on the WiFi router directly.
- Metal sieve
- USB extension cord
- USB WiFi dongle
- Wire Snips
- Use the snips to create a hole in the middle of the sieve, just large enough to force the USB extension cord through.
- From the other side, connect the USB WiFi dongle to the extension cord.
- Secure the extension cord to the sieve with glue or electrical tape, then wrap the cord around the handle and secure this section again with glue or tape.
- Watch your WiFi signal boost to the max.
Create Your Own Radar Dish
- Using Aluminum foil to create a radar dish, you will need:
- Plastic bowl
- Foil
- Electrical tape
- WiFi adapter that connects to your USB port
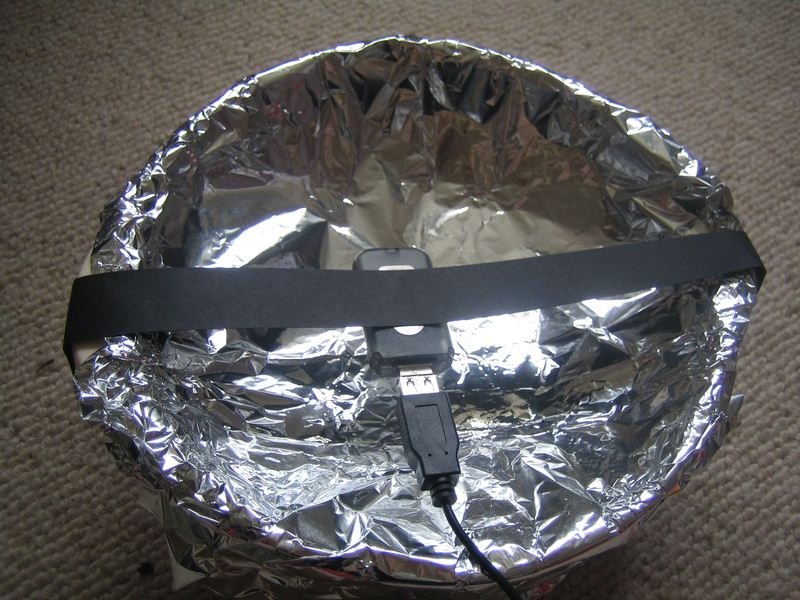
- Put foil over the top of the bowl and push down a little in the middle.
- Stretch a strip of electrical tape over the center of the bowl, sticking to either side.
- Stick WiFi adapter (connected to USB cable), to the sticky underside of the tape, thus boosting your WiFi signal.
Build Your Own Wifi Antenna, or Cantenna
Although this appears strange at first, I promise you it works. It sounds more complicated than it is because of all the technical names, but all these parts are easily found online, using the names listed here. Cantennas are becoming so popular they are even sold in kits, if you have a good search around, saving a lot of hassle.
- Pringles can/coffee can – Soup and veg cans work too but they need to be a large size; also try the tube boxes that whiskey bottles sometimes come in.
- WiFi USB adapter with removable antenna.
- Pigtail cable (find on stores and websites as RP-SMA Pigtail).
- Bulkhead connector (N-type female chassis connector).
- Copper wire – make sure it’s a good gauge/thickness – you only need a very small amount (around 1.25 inches/3 cm).
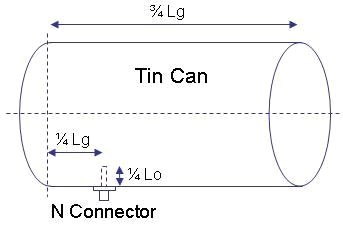
- Solder the copper wire to the end of the chassis connector. Then make a hole in your tin can, big enough to house the connector you just made.
- Push through the N-type connector, so the wire is inside the can, and part of the connector is still outside. You’ll need to leave this section outside of the can, so you can connect it to the pigtail cable. Screw the items together (using the larger end of the pigtail cable).
- The end of the pigtail cable with the smaller connector will now screw onto the USB WiFi adapter (removing the supplied antenna first).
- Point towards your chosen router for huge WiFi signal boosting results.
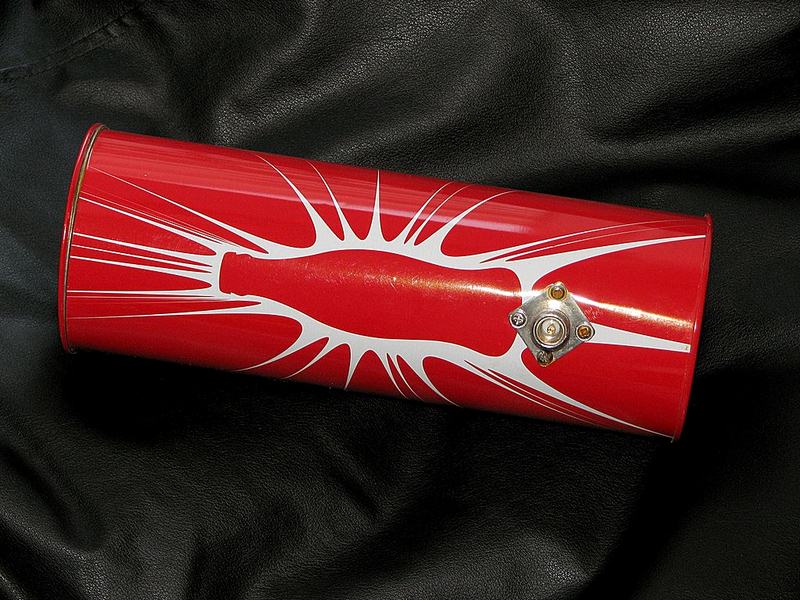
Using a DIY WiFi booster in your home can give instant signal boosting results in no time. If you aren’t sure how successful your chosen method of WiFi signal boosting has been, check the number of bars, or percentage rating, for your WiFi router, without the use of your WiFi signal booster, and then check it again afterward. Not only will you be amazed by the results, but you’ll also certainly never look at a Pringles can, in quite the same way again!
If you are getting your internet service from any fiber internet service provider then you can check the best quality router for att fiber by boneheadphone.
Resources
- Do-It-Yourself Wireless Antenna Update “extend your signal”
- Foil reflector & Radar Dish images are by Authors







1 comment
I have tried the Aluminum foil trick and this worked. I even wrote a guide on how to create the WiFi that signal amplifier.
Thanks for sharing mate. 😉