Table of Contents Show
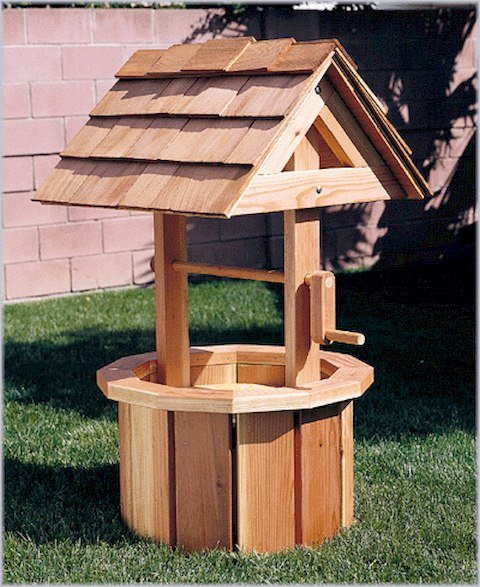
DIY Wishing Well: Easy Directions for How to Make a Wishing Well — When we think of yard decorations, wishing wells seem to always come up. These timeless traditional pieces make great conversation pieces, as well as another place to put your favorite plants. These easy to follow plans will have you enjoying your very own wishing well in mere hours.
DIY Wishing Well – A Historical Representation in the Garden Home
The wishing well in its traditional sense has always been a small pond fed by a stream or other sources. When in a public setting, history reveals that people have always tossed in coins and made wishes. Sometimes it was to a specific god or goddess, or to the gods in general. This depended on the culture and religious beliefs of the people. Where the wishing well was located had a lot to do with the traditions observed there.
One very famous wishing well is located in England at the northeastern tip of Northumberland county. This British well is called the well of Coventina. This well served the Roman British as well as the Celtic followers of Coventina. Traditionally, people passing by made requests or desired favor by throwing in coins which will have all time value. This well was found among temple remains and so the theory is that people were making offerings to the goddess Coventina.
Another famous well named Pen Rhys in Oxford, has been traditionally used by a people who do not recognize one specific god, but the vague notion of a higher power. Here, people have traditionally been known to throw in pieces of clothing or tokens to request cleansing from illness. They believe the waters of this wishing well offer cleansing powers.
So you see, there is much history behind the wishing well. In more modern times, people enjoy them as places of hope and also places to toss in coins that they are told will go to charity. The wishing well is remembered and romanticized in gardens all over the world in the form of the wooden representation of the water filled versions. Usually billowing forth from its bowels are gorgeous plants of nature that give a return of joy to all who pass by.
These directions show you how to make this wishing well, which is octagonally shaped. It is not only beautiful and interesting to look, at but also one of the easiest to build. The supplies you need are minimal.
How to Make a Wishing Well — What You Will Need
(All wood is pressure treated or hard wood for outdoor durability)
- 84- 14″x2″x3″, (94′ )–(4 of these are for the upper braces of the well; they need to be cut at 45 degrees on each end tapering inwards on each end to make the center 12″, keeping the outer portion 14″)
- 4- 2″x3″x17″for the roof (cut 45degree angles in same direction on each end, to achieve parallel, with final length 17″ from tip to tip)
- 2-1″x4″x4′ long pieces for the legs to the roof.
- 14- 1″x4″x2′ pieces for the roof of the well and the frame that supports it
- 26″ L x 1″ diameter dowel stick
- 130- 3″ self starting screws
- 24-1 1/2″ self starting screws
How to Make a Wishing Well — Tools Needed
- Saw of your choice
- Drill with screwdriver head to fit your screws or a screw driver
- Protractor or miter box
- Tape measure
- Pencil
DIY Wishing Well — Step #1
- Begin this project by laying out four of your 14″x2″x3″ pieces on a clean, flat surface .
- Follow the diagram to find the correct placement.
- This is a rough layout to start, but you will see it quickly comes together.

*Note: You are making an octagonal base.
DIY Wishing Well — Step #2
- Next, place your second round pieces on top of the first, filling in the opposite sides of the octagon.
- Follow the diagram closely for placement.

- Screw these pieces to the bottom round with 3″ screws.
- Repeat in this manner until you have completed all 10 rows.
- Your last row will appear to go up and down all the way around.
DIY Wishing Well — Step #3
- Now that your base is completed, you need to install your legs for the upper portion of the wishing well.
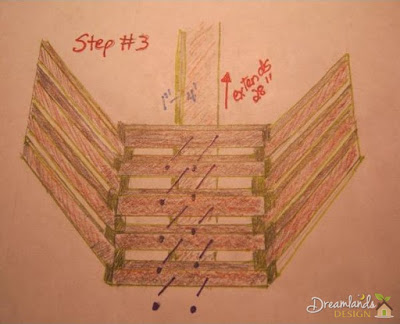
- To do this, center up your 1″x4″x4′ long leg along the side.
- Screw into place using 3″ screws using the diagram as your guide.
DIY Wishing Well — Step #4
- Next, butt your 1″x4″x4′ pieces together to create the base frame for the roof.
- Keep each side parallel; make sure the side ends overlap so that you can screw the wood together from the side.
- Screw together using 1 1/2″ screws.

DIY Wishing Well — Step 5 & 6
- Now, it is time to attach the frame you just made in step #4 to the legs for the roof.
- To do this, you must find the center point on both the sides of the frame as well as the legs. Mark these for reference.
- Attach with 3″ screws in the locations indicated on the diagram.

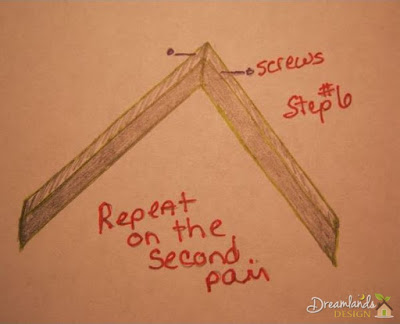
- Next, butt together the 17″x2″x3″ pieces to form the top of the roof angle.
- Screw this together using 1 1/2″ screws, following the diagram.
DIY Wishing Well — Step #7
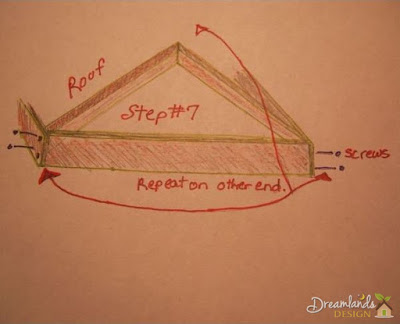
- Attach the upper roof frame to the bottom roof frame.
- Follow the diagram for placement.
- Secure with 1 1/2″ screws.
DIY Wishing Well — Step #8
Finally, it is time to finish the roof. To do this, start at the bottom of the roof side, and attatch your 1″x4″x2′ board to the frame with 1 1/2″ screws. Leave an overhang of 1/2″ only.Only attach at the bottom, then proceed with overlapping the second slat 1/2″ over that. Secure this with the screw that goes through the second slat from the bottom as well as the bottom slat.

Following the diagram, you can see how each section attaches to the next above it until you reach the top.
Repeat on the opposite, side and butt the two sides together at the top of the roof to make a tight seal. If you want a more watertight wishing well, run a thin line of clear waterproof caulking along the top of the roof.
Now that you know how to make a diy wishing well, you can make one for each of your friends. Set out some plants in your new garden art, and enjoy this lovely piece of history for years to come.
References
- “Wishing Wells” by Lauren Tabila, James Green, Jonathan Kwok, Kara Thurn, Meagan McLaughlin, http://www.anthropology.uci.edu/~wmmaurer/courses/anthro_money_2006/wishing.html
How-To Magic
When you know how to make things yourself, there is a sense of pride in that. When you find just the right instructions to help you in your adventure, that is a match made in Heaven. Dream Lands Design strives to bring you just that. Concise clear, visual instructions on things you want to know how to do.
- DIY Stylish Corner Computer Desk Plans
- Moving Made Easy: How to Pack a House
- DIY Plans for an Entertainment Center with Download
- DIY Wishing Well: Easy Directions for How to Make a Wishing Well






1 comment
Great article! The instructions for making a decorative wishing well were clear and easy to follow. I appreciate the step-by-step guidance provided, which made the whole process enjoyable and hassle-free. The article’s inclusion of materials needed and tips for customization was helpful as well. Overall, I’m grateful for this fantastic resource that enabled me to create a beautiful decorative wishing well for my garden. Thank you!