Table of Contents Show
Introduction
Floating shelves offer a sleek and modern way to display collectibles, books, and other items without visible support. This DIY project allows you to transform an old door or craft a new shelf that showcases your style. With a simple construction process, you can create shelves that appear to float effortlessly on your wall.
In this guide, you’ll learn how to build a floating shelf from a hollow core door, making it both functional and a beautiful addition to your space. Discover the steps to cut, install, and finish your shelf for a stunning focal point.
Overview
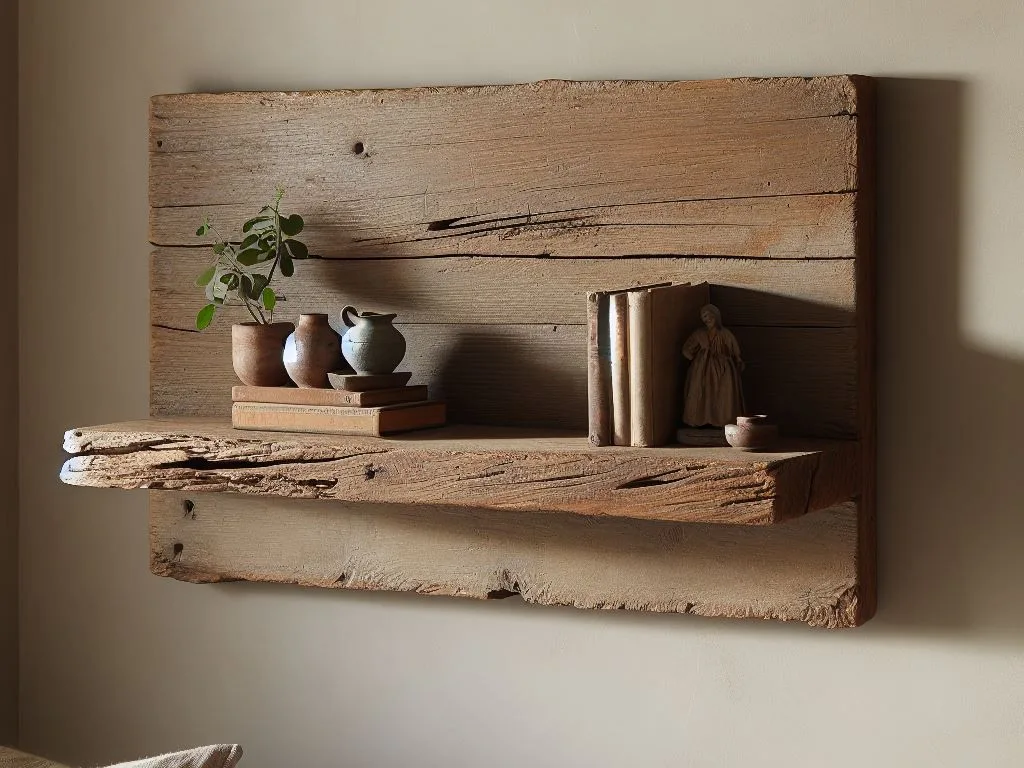
A floating shelf appears to “float” on the wall without visible support. There are no ugly shelf brackets, legs, or awkward supports to work around or distract from the items on the shelf.
Make these functional and beautiful shelves from a hollow core door for a permanent installation or build them from scratch for a set of shelves you can take down and use over and over again. Here’s how to build a floating shelf from a hollow core door.
How to Build a Floating Shelf
Cut the Door
- Cut an 18-inch hollow core door down the middle from top to bottom, leaving two 9-inch wide sides. A finishing blade in a circular saw against a straight edge is good for this task, but a table saw will work even better.
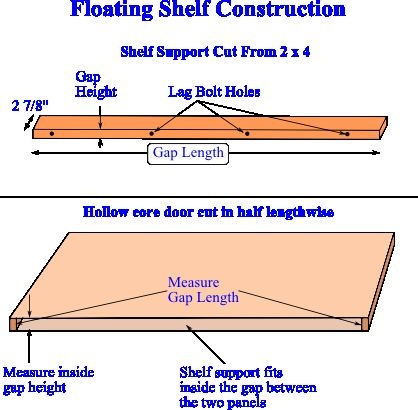
- Measure between the two outside panels of the door to find the gap between them. Make this measurement at the top or bottom of the door next to the door frame.
- Measure the length of the gap between the top and bottom of the door’s frame.
- Between the panels, you’ll notice cardboard supports. Remove these to a depth of about 3 1/2 inches with a sharp chisel.
Make the Support
- Cut a straight 2-by-4 to fit lengthwise into the gap between the two door panels, as if to fill the entire gap from top to bottom. Make it 1/2-inch shorter than the gap is long.
- On a table saw, rip the 2-by-4 down to 2 7/8 inches wide.
- Rip it a second time on the height to the gap width on the door. The shelf support should fit snugly, but not bulge the door panels when it is inserted.
Install the Support
- Draw a level line on the wall the length of the shelf using a 4-foot level as a guide where the shelf will be installed.
- Find the studs along the line, marking both sides of each stud.
- Hold the shelf support against the line and mark the stud centers on the support.
- Drill a 7/16-inch hole through the support from edge to edge and into each stud.
- Fasten the support to the wall using 1/4 x 5 1/2-inch lag bolts.
Install the Shelf
Installing the shelf is the last step when building a floating shelf.
- Test fit the shelf by slipping it over the support and making any adjustments before installation.
- Apply yellow wood glue with a brush to the upper and lower side of the shelf support, and inside the shelf panels.
- Slip the shelf over the support and make any side-to-side adjustment necessary, such as to align with another shelf.
- Use a 12-inch level to ensure the shelf is level from front to back and nail the shelf to the support with 3/4-inch brads on the top and bottom.
Custom Shelf
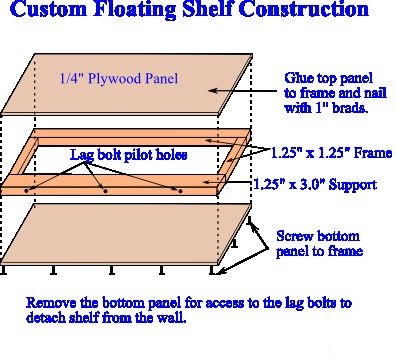
Because the shelf made from a hollow door is glued to the support, you won’t remove it without destroying it. Here’s how to build a floating shelf similarly. Cut an upper and lower panel from plywood and a frame from 2 x 2 and 2 x 4 lumber.
Glue and brad nail the top panel to the frame, but attach the bottom panel to the shelf with only wood screws — don’t use glue on the bottom. The lower panel can be removed at a later date for access to the lag bolts to remove the shelf from the wall.
Conclusion
Building a floating shelf with no visible supports is an excellent way to showcase your favorite items while adding style to your space. Whether you repurpose an old door or create a custom design, these shelves combine functionality and beauty seamlessly. Follow the steps outlined to create a sturdy, attractive shelf that can be a focal point in any room.
Ready to elevate your home decor? Start your floating shelf project today and enjoy the satisfaction of your handiwork on display.
References
- Build it With Ana: Floating Shelves, https://www.younghouselove.com/build-it-with-ana-floating-shelves/
- How to Build Adjustable Shelving
FAQs
To build a floating shelf, you will need a hollow core door, a straight 2-by-4 for support, yellow wood glue, a circular saw or table saw, a level, lag bolts, and brads for nailing. Additional tools may include a chisel, drill, and measuring tape.
While you can use different types of doors, hollow core doors are ideal due to their lightweight and structural integrity. You can also customize them with paint or trim to match your decor, making them functional and beautiful.
To make sure your floating shelf is level, use a 4-foot level to draw a straight line on the wall where you plan to install the shelf. After attaching the support and before securing the shelf, use a 12-inch level to check that it is even from front to back.
The shelf made from a hollow door is glued to the support, which means it cannot be removed without damaging it. However, if you build a custom shelf using plywood and 2 x 2 or 2 x 4 lumber, you can attach the bottom panel with screws, allowing for easier removal in the future.
Start by cutting the hollow core door in half lengthwise to create two 9-inch wide panels. Next, measure and remove the cardboard supports inside the door to a depth of about 3 1/2 inches using a sharp chisel, making space for your support.
Floating shelves create a clean, modern look, allowing your items to take center stage without the distraction of visible brackets or supports. They are perfect for displaying collectibles, and knick-knacks, or even for practical storage, enhancing both functionality and aesthetics in your space.


