Table of Contents Show
Have you ever dreamed of having a yard swing that you built yourself? Now you can turn that dream into a reality. This guide provides clear steps that demonstrate the entire building process, complete with numerous real-life photographs to guide you along the way. Additionally, printable instruction sheets are available for your convenience.
Once completed, you will be able to enjoy your swing in your yard for many years to come. This project can easily be finished in just one day, or you can choose to take your time and savor each step. Create the yard swing you have always wanted and make your outdoor space more enjoyable.
This durable yard swing design has proven to be reliable and will enhance the charm of your yard, just as it has done for mine. The straightforward instructions presented here feature step-by-step photos and detailed explanations of each part of the process, ensuring you can follow along with ease.
Who doesn’t love the simple pleasure of relaxing in a swing in their yard? Picture yourself sipping iced tea, feeling the gentle summer breeze as you swing back and forth. These directions illustrate how to build a frame yard swing that is not only sturdy but also easy to construct. This swing is designed to last for years, just like the one I built.
Materials Required
To get started on your frame yard swing project, you will need to gather several supplies. Below is a comprehensive list of materials required for building:
- Seven pieces of pressure-treated lumber measuring 4 inches by 4 inches and 10 feet long.
- One piece of pressure-treated lumber measuring 4 inches by 4 inches and 6 feet long.
- Three pieces of pressure-treated lumber measuring 1 inch by 4 inches and 6 feet long.
- One piece of pressure-treated lumber measuring 2 inches by 4 inches and 5 feet long.
- Two L brackets, including screws.
- A total of ten large bolts.
- Ten nuts that fit the bolts.
- Ten large washers that will securely cover the bolts, with a circumference larger than the bolts and extending 1/4 inch to 1/2 inch beyond the bolt heads.
- Approximately 75 self-starting small to medium-sized screws, preferably rust-resistant.
- Four large S hooks.
- Two heavy-duty eye bolts.
- Four heavy-duty hooks with a slight opening.
- About 20 to 25 feet of swing chain.
- Two bags of cement.
- A drill.
- The appropriate drill bits for the bolts.
- A screwdriver or driver bit for your drill that matches the screws you selected.
- A wrench or pliers.
- A hacksaw.
- A jigsaw.
Once you have gathered all the necessary materials, you can begin the exciting process of building your own frame yard swing. With dedication and attention to detail, you will create a beautiful addition to your outdoor space that will provide comfort and enjoyment for you and your loved ones.
Instructions: How to Make a Frame Yard Swing
This swing goes together very easily.
Step 1:
Cut Notches in the Posts
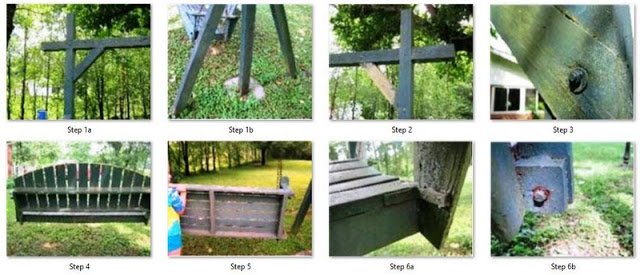
First, you need to cut a notch 4″ wide approximately 12″ down from each end of your top post and 12″ down from one end of both of your side posts.
- This will be a notch and they will fit together like a “T”.
- The legs span 60″ wide with the side two angled towards the middle post.
- Bury these approximately three feet deep and backfill the holes with cement. This provides a strong foundation.
Get Your Angles
You get your angles after you place the center post in the ground. This will take several people to do. Do a mock leaning off the post, and mark the line to cut. This is the easiest way to get a true angle that fits with the holes that you dug.
- If you are off by a small amount it will not affect your angle cuts negatively.
- Cut the angles before placing the bracing legs into the ground.
Attach the Legs
Bring the angled legs to the main post, and screw it in place with several screws. Repeat this for the other side.
Having several people ensures the center post stays level and plum. Use your level to guarantee perfection. Let both sides harden in the ground before you place the top on.
Measurements
The center post will be approximately 8′ above ground and buried 2′ in the ground.
The side posts are 5’4″ above ground and three feet in the ground, totaling 8′.4″
Step 2:
When working on your project, having a few strong individuals to assist you can make a significant difference. If you do have help, you can place the top beam onto the structure before the cement sets. This allows the top beam to bond well with the rest of the framework while the cement is still wet. However, if you are working alone or lack sufficient support, it is wise to wait until the cement hardens completely. This will ensure stability and prevent any wobbling during installation.
Once the cement has set or you have placed the top beam with help, the next step is to secure the top beam to the side beam. To do this, drill a hole straight through both beams at the point where they meet. Ensure that the hole is aligned properly to maintain strength and stability.
After drilling the hole, take a large washer that has a small hole in the center. Position this washer over the drilled hole on one side of the beams. Next, insert a bolt through the washer and then through both beams. This process helps in evenly distributing the load and adds strength to the connection.
Once the bolt is through the beams, secure it in place by attaching a nut on the other side. Tighten the nut firmly using a wrench or pliers. This will lock the beams together, providing a strong and stable support for your project.
Step 3: Cut and Secure the Angle Braces
Next, you need to cut the angle braces. Depending on your preference, you have two options for securing them:
- Inside Installation: Place the braces on the inside of the structure and screw them in.
- Notching: Notch them out on the backside to provide extra strength.
Determining Brace Length
If you plan to notch the braces, keep in mind that their length will be approximately 28 3/4″ from tip to tip. In this case, you’ll need to cut a 29″ piece and use the outside of the structure as a guide to draw your angles.
Drawing Angles for Non-Notched Braces
If you choose not to notch the braces, then draw your angles by referencing the inside of the frame both at the top and bottom.
Notching Technique
When notching, it’s important to remove an equal amount of thickness from both pieces that will be joined together while keeping the width consistent with each individual piece. Since all these beams are 4″ square, there won’t be any irregular sides to consider.
Note: Do not remove more than half the width of any single board as this will weaken the structure instead of reinforcing it.
Securing with Bolts
Once everything is in place, secure the angle braces using bolts just like you did before when attaching the top to the sides.
Step 4: Frame the Swing
Now it’s time to frame the swing itself. Follow these steps:
- Cut the top back frame board: Measure and cut the top back frame board to a length of 54 inches.
- Cut the side pieces: Each side piece will be 15 inches long. Make sure to cut two of these.
- Cut the bottom piece: The bottom piece should be cut to a length of 52 3/4 inches.
- Taper the side pieces: The 15-inch side pieces need to be tapered to 2 1/2 inches at the bottom. Start 4 inches up from the bottom and draw a line to the end, making it taper. This will tilt the back to a comfortable angle. Cut both sides this way.
- Assemble the frame:
- Place the top piece on a flat surface, standing up on end.
- Position the side pieces underneath the edges and screw down from the top.
- Insert the bottom of the frame on the inside of the piece, 6 1/2 inches up from the bottom, and screw it together from the outside in.
By following these steps, you’ll create a sturdy frame for your swing’s backrest.
Step 5: Frame the Bottom of the Seat
Now, it’s time to frame the bottom of the seat.
Materials Needed:
- 2×4 boards (for side pieces and middle brace)
- Screws
- Wood glue (optional)
Instructions:
- Cut the Boards: Cut the front edge board and the back bottom edge board to a length of 59″. The side pieces and middle brace should be cut to a length of 19″ using 2x4s.
- Measure for Width: When assembling the frame, measure from the edge of the front and back seat pieces to determine the width of your 1×4. Note that the actual width may not be exactly 4″, but rather 3 3/4″.
- Marking: Use a piece of your wood to measure in from the edges of both the front and back seat pieces. Make a mark on each end of both the front and back boards.
- Screw Together: Screw your side pieces, front, and back together by attaching them to the outside edges of the 1×4’s.
- Optional Curve: If you desire a curved seat, make cuts into the side pieces and middle brace before screwing everything together.
- Flush Top: Ensure that the top surface remains flush as the seat boards need to have matching edges for a smooth finish. Lowering the side pieces and middle brace will result in an uneven surface for attachment, causing sagging in certain areas.
Remember, it’s crucial for the frame to fit flush with each other!
Step 6
Now you screw the bottom frame and back frame together using the L brackets. This gives you the angle you need and you now can screw your arm into place. The piece of the arm that goes down the front needs to be 12″ long, cut from the 1×4’s. The armrest is 26″ and the back piece of the arm is also 12″.
- Bolt the front piece onto the bottom frame.
- Continue with the back piece. Bolt it to the back of the seat frame.
Now place the armrest on top and screw it to the front and back pieces. Drill a 1 1/2-2″ hole on the inside of the arm just inside the front panel. Do the same on the back panel. Keep these holes to the inside as this is where your chain will need to go through.
You can straight cut or round the edges. The swing is fully functional either way. The style is up to you.
Step 7
Now it’s time to place the back slats and seat slats on the frame.
Attach the Seat Slats
Starting with the seat, cut six 1″x4″‘s to a length of 54″ or 4 1/2 feet. Secure the seat slats with screws to the end boards and center brace.
Attach the Back Slats
Attach all of the back slats keeping the bottom edge flush to the bottom of the bottom of the back framing. The top will be rectangle shaped. If you want this curved, make a mark on each edge at 11 1/2″ from the bottom. then 7 slats in for your middle point.
Use a string and a pencil and have someone hold the string on the bottom center of the 7th board and draw a curve from the outer marking on the last slat of 11 1/2″ and it will gradually get taller finally merging with the 18 ” center. Repeat in the other direction to get the other half done the same way. Now that you have a curve drawn, use a jigsaw and cut the tops along that line. This is how you get that curve.
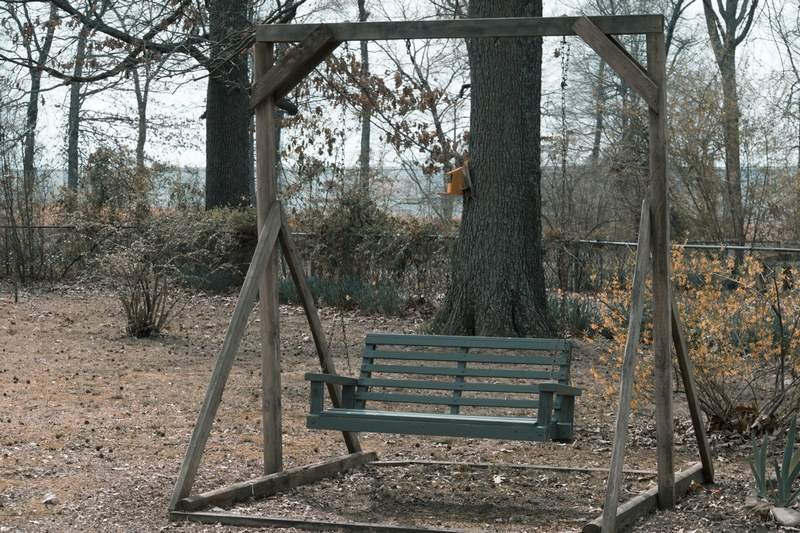
The finished swing will look something like this from the side.
Finishing Touches
Now it is time to install the hardware that will hold your swing above the ground and from the nice frame, you just built.
- Trim any bolts so that they do not stick out and become a hazard to someone. You can do this with a hacksaw or any tool you find appropriate.
- Install the hooks that will hold the chain at the bottom of the arms.
- Thread your chain through the holes you made in the top of the arm.
- Attach these two chains to an S hook.
- Screw in the two eye bolts into the top of the frame.
- Attach your remaining connecting chain to an S hook at the top and the S hook holding the two chains together.
Víola!
You now have a swing that will last you for years and years.
All that is left to do is paint or stain it. Since it is pressure treated, you can leave it if you wish. It is best to finish the wood, as the sun will damage the wood and moisture in shade can deteriorate the wood also.
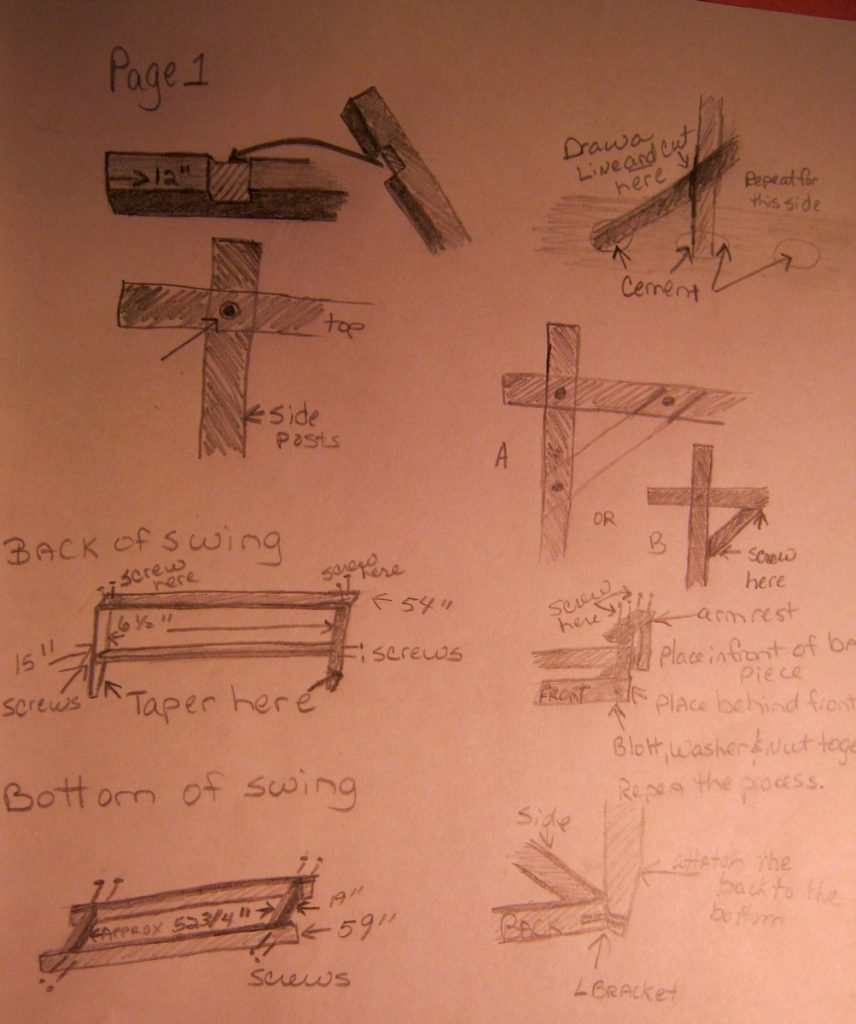
Here are free printable drawings to guide you through the process and give you a closer view of what you need to do. Be sure to get Yard Swing Free Plans – Page 1 and Yard Swing Free Plans – Page 2 of the directions.
How-To Projects for Your Yard and Garden —Make Life More Fun!
Why live with boring when you can spice up life just a little bit with your own creations in the yard and garden. These easy step-by-step, visually enticing articles are sure to have your creative juices flowing in no time! If you can dream it you can do-it-yourself. Go on, make your life more fun!
- Build Your Own Frame Yard Swing
- Keep the Greenery on Your Patio Green – Even When You are Away
FAQ:
To build your own frame yard swing, you’ll need several pieces of pressure-treated lumber, L brackets, bolts, nuts, washers, screws, S hooks, eye bolts, swing chain, cement, and some tools like a drill, saws, and a wrench. A complete list is provided in the guide for your convenience.
The project can typically be completed in just one day, but you can choose to take your time and enjoy the process at your own pace. The detailed instructions will guide you through each step.
No special skills are required! The instructions are designed to be straightforward and easy to follow, with step-by-step photos and clear explanations. As long as you’re comfortable using basic tools, you can successfully build your own swing.
Absolutely! You can customize the swing’s design to fit your style and preferences. Whether it’s the shape of the seat, the color of the wood, or the overall dimensions, feel free to make adjustments as desired while following the basic construction guidelines.
To ensure stability and safety, make sure to follow the instructions carefully, especially when securing the posts and beams. Using a level to check for plumb and ensuring the cement has set properly before attaching the top beam will contribute to the swing’s strength. Additionally, trim any protruding bolts and check all connections regularly for wear and tear.


2 comments
Great article! I’ve always loved to implement swings of one kind or another into my own landscaping. They can add a really unique look if done right.
Thank you jordan, you’re right … swing is going to beautify your landscape if done right